I have some interesting news. Universal Electronics Industries Ltd, the maker of the Holga, is going to run a Kickstarter campaign for Holga Digital, a small digital camera with a Holga based lens. The project was developed by the original Holga manufacturer with the help of the Smartgears team. Smartgears is a Hong Kong based company that specializes in digital home automation products.
The camera will look like a miniaturized Holga 120N.
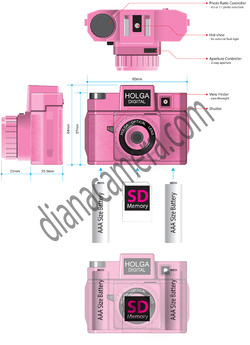
These are the preliminary specifications I got from the company:
Size: 64mm tall x 80mm wide x 48.5mm depth (2.51in tall x 3.14in wide x 1.9in depth)
Fixed focus camera.
focus distance: 1.5m to infinity.
The camera will be able to switch from a square format (2540 pixels x 2540 pixels) to a rectangular format (3266 pixels x 2540 pixels). The photo size ratios are 4:3 and 1:1 which they picked to mimic the size ratios of 35mm and 120 film. Presumably, this will give the digital images the look of the original Holga film cameras and the Holga optics should give the images the low fidelity quality that the original cameras are famous for. The format controller (it is called the Photo Ratio Controller) will be the “winder” knob.
It will take SD or SDHC memory cards.
The camera will have camera strap attachment points on each side of the camera, like the full sized Holga and will also feature a tripod socket.
There currently is no self-timer or cable release socket in the design, but they are considering adding one or the other of these to the final product.
The Holga Digital will have a standard hotshoe. The original Holga color flash will be compatible with the camera.
While it probably won’t be part of the Kickstarter project, they are working on an adapter so that the Holga Digital camera will work with the original Holga accessory lenses.
I don't have any information on what the Kickstarter rewards prices will be, but the post Kickstarter price will be in the range of $60-75USD.
The Kickstarter funding goal will be in the range of $35,000 to $50,000.
It appears that the camera will be offered in a variety of colors, much as the Holga 120N is.

I will be getting a prototype to check out and I will post a review and photos of this camera when I finally get it in my hands.
The Kickstarter campaign is scheduled to launch today. As of 8:00am PST, it isn't yet up on the Kickstarter website.
Look for my review and hands on video in the coming weeks. I’ll also post updated information about the Kickstarter project when it becomes available.


 kaiy
kaiy;)
;)
;)