Powered by Squarespace
Contact

contact:

This form does not yet contain any fields.


    Entries in diy (4)

    Monday
    Oct132014

    Pinhole Camera Experiment: Cashew Can


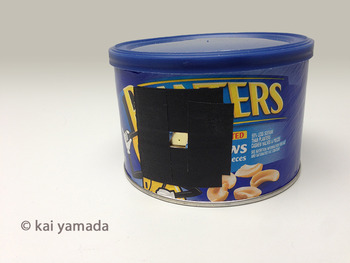
    I've been wanting to experiment with pinhole cameras. For my first camera, I thought I would make a traditional shoebox pinhole camera using paper negatives, but I was unable to find a simple shoe box that would do. I decided to try making a camera with what I had on hand. I found a cashew can that looked like it might make a good camera.

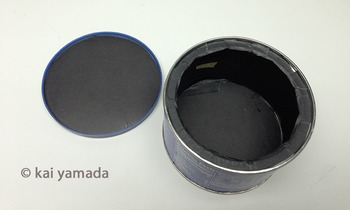
    The pinhole was made on .002" brass shim stock I picked up at my local hardware store. Instead of painting the tin black inside, I happened to have some heavy black paper stock on hand. It was cut down, fitted and taped to the inside and lid of the can.

    I made the pinhole using a #10 beading needle that I picked up a bead store. It measures out to be .019" as measured with a micrometer. I'm not sure if that is the appropriate size for my can, but I decided for my first experiment, I wouldn't worry about it.

    With the black paper in the lid and the wide lip, which was also covered with black masking tape, I am hopeful I can get away with not having to tape up the lid, but I will have to test the camera for light tightness.

    The can will take a paper negative, 2x8inches. I need to test the pinhole size by making some test exposures, but unfortunately, the weather forecast expects it to be raining all week, so that will have to wait until we get some sun. I could make some exposures in the overcast, but I would rather wait until it is sunny, when it would be quicker to make consecutive test exposures to nail down the correct exposure.

    Wednesday
    Mar042009

    DIY 35mm for Holga and Diana Cameras


    Here is my procedure for shooting 35mm film in a Diana (vintage or Lomography Diana+) or Holga. This should work for any camera that has a roll film compartment big enough for a 35mm cassette. I have a few older box brownies and folding cameras that use defunct film sizes that I will try this with.

    Unloading the Camera:
    Unloading the camera must be done in absolute darkness. If you don't have a film changing bag (you can get one from BH photo video or Freestyle Photos Supply), you can use a dark room. A windowless bathroom is ideal. Throw a towel across the bottom of the door to block out any stray light.
    Open the camera.
    Remove the 35mm film cassette and rewind the film back into the cassette.
    Take the film to a photo lab and get it processed.
    Tell them you do not want the negatives cut. Give them your 35mm plastic film container to put the film in when they are done. The reason for this is that the negative frames will be unevenly spaced and you will want to trim them so that they fit in a standard 35mm negative page. (also at BH photo or Freestyle).

    You can ask, but they probably won't be able to deal with printing your negatives either, since they will be quite a bit wider than a standard 35mm negative. Even if you are willing to let them crop your image down to a 35mm frame, you will probably also want to include the image around the sprocket holes. Most 1-hour lab equipment won't print these, since it is not part of the normal image area for a 35mm negative.

    If you want the entire negative, including the sprocket holes, your best bet is to get a film scanner. If you are on a budget, and most of us are, look at the Epson V500. The Epson 4490 is also a good choice. It is no longer in production, but if you go to the Epson website, they often have refurbished units for sale.

    Edit: June 5, 2010

    There seems to be some confusion about getting prints from 35mm film shot this way.

    If you are looking for a simple way of getting prints out of your 120 film camera by shooting 35mm film, this isn't it.

    While 35mm film is easier to get processed, the negatives created by shooting them in a 120 film camera are non-standard. Most 1-hour labs can't make prints, unless you don't mind getting parts of the image cropped out. Even so, they may not want to deal with your DIY 35mm film in making prints. They will have to manually set-up each print, because their automated equipment won't work.

    There are labs (usually smaller mom and pop operations or specialty labs.) that can deal with this, but you will have to do the legwork and call or visit them in person to ask.

    The best way of getting easy-to-print 35mm images is to use a 35mm lo-fi camera.


    Friday
    Jun272008

    Video: Holga Modification - Velcro


    Have you ever had the back of your Holga unexpectedly pop open? This is the Holga mod for you! In this video, I show you how to apply velcro to keep the back from falling off, and to protect the counter window.

    All my how-to videos can be viewed here:
    /?page_id=108
    Saturday
    Jan052008

    Welcome to dianacamera.com

    New York City, 2006

    Welcome,

    The purpose of the website is to share my images and techniques. I like to work with plastic or toy cameras, especially Holga, Diana camera, and Jamcam III. Fun with plastic!

    If you would like to post a comment, you will need to register. It’s easy and simple. To register, go to the No Comments or Comments link at the bottom of the post, or go to the Meta category in the right column, and click on the register link.

    –Kai